10:30: For some reason an iPad won't give a scroll bar for blog windows. Oh well.
Martha is still in the kitchen making an apple cake. She is really cracking on Alexis. Who knew she had such a good sense of humor? Her appearances on Conan were not a fluke.
10:39: We won't get to actually try the cake and soup, but we will get the recipes for free. I can guarantee that rookies will demand that apple-nut cake.
Tuesday, October 4, 2011
Live from the Martha Stewart show!!!!
Hello my intrepid, Super Crafters!
I am so very happy to be coming to you from THE crafting Mecca--the Martha Stewart Show!!!!
I'll be updating until about 11:30 am on the blog and Tweeting @HandwerkBKLYN, in addition Tweet chatting at tweet chat.
9:54: Martha is only moments from Martha. And they just let us tour!
10:06: Alexis's book is not an autobiography! Repeat, the book is not an autobiography!
10:09: Even Martha believe's that people should stay home and craft.
10:10: Demo on crackle paint. It can be a messy project, but it looks like the Martha products make it simple. Two steps! The crackle base and the paint overlay.
10:15: Martha's in the kitchen, but I'm wondering what I'm going to make with the Martha Stewart acrylic paint.
Walking into the studio there was a HUGE photo of the new Martha Stewart yarns from Lion Brand and I got sudden urge to knit. "Must knit now."
Thursday, September 29, 2011
Set Those DVRs!
Greetings, Super Crafters! Boy, do I have some great news for you.
It should come as no surprise that I have an admiration of Martha Stewart. She may be a symbol of suburban perfection, but the woman is amazingly talented, imaginative, and ambitious! She is definitely one of my role models as I begin my arts and crafts business adventure.
That is why I am sooooo excited to announce that Handwerk BKLYN has been invited to live blog an episode of 'The Martha Stewart Show' during National Crafts Week!!!
Next Tuesday, October 4th, from 8 am to 11:30 am Handwerk BKLYN's very first intrepid correspondent, Amanda Jayne, will be gleefully updating the whole Martha Experience.
There will be more details this weekend on Tuesday morning about the live blogging and the air date of the episode we will be covering. Until then, stay crafty.
Wednesday, September 28, 2011
It's To Dye For
Like most people, when you see an item of clothing you like in a store, online, or in a magazine, you look to see if they have it in a different color. Maybe it’s the cute little red dress that you’d rather have in black or it’s the last t-shirt in your size that looks amazing on you, but all they have is plain, old white when all you really want is a shirt in the Pantone color of the year, Honeysuckle!
Friday, September 9, 2011
At Long Last...
Hello, Super Crafters.
A funny thing happened the morning after the Big Clean—I woke up with strep throat!
My throat was swollen, my neck was stiff. I was feeling feverish, but not running a fever. Twas not fun.
A few things helped, though. One was that I went to see my doctor on day 2 of feeling sick. Another was 'Cheers' on streaming Netflix. And the last was definitely having a CLEAN and ORGANIZED room!!
Sunday, September 4, 2011
What I'm about to show you might be shocking...
But this is the sad state of affairs my room is in. WARNING: Do not view if you faint easily at the sight of messiness and disorganization!
Thursday, August 25, 2011
LADIES + GENTLEMEN, WITHOUT FURTHER ADO...
Hello, Super Crafters!!!
As I hinted at yesterday, I have some very exciting news to share: on Wednesday, February 22nd, Handwerk BKLYN will go live as an Etsy shop.
Why February 22nd? Why not today? Well, there’s a lot of things to do to start your own business.
You wouldn’t believe how much there is to do: getting the right city, state, and federal licenses; obtaining trademarks and copyrights; opening a small business bank account; and then, finally, building an inventory of items so I can actually sell something.
Don’t worry, though, I will not be forgetting all of you. I’ll still be updating the blog and posting projects and tutorials. I’ll also be posting updates on the Etsy shop progress, so you’ll get to watch it grow.
Keep on craftin’.
Kerissa
Wednesday, August 24, 2011
Big News On Its Way
Hello, Super Crafters!
Tomorrow is the one month anniversary of Handwerk BKLYN and the projects have been resounding successes. For those of you who check regularly, thank you so much!
Tomorrow will also bring an exciting piece of news, so make sure to check back in at 12 pm EST to find out!!!
Till then, keep on crafting ;D
Monday, August 22, 2011
Crafting & Me: The Early Years, Pt. 2
It’s kind of muddled up in my memory which craft I did first. Crochet? Cross-stitch? I have early memories of both. Each gave me so much: mountains of pleasure, peace, stability, creativity, a sense of accomplishment, pride, and a connection with the most influential person in my life — my Grandma.
Saturday, August 20, 2011
My First Terrarium (La-La-La-Laaaaaaaaaaaaaaa)
I've been very interested in gardening and plants all my life, but started getting serious about it for the last couple of years. Living in a third floor apartment in Brooklyn, though, can be difficult when you actually want to get your hands to get dirty. To begin with, plants are expensive. You'd think they wouldn't be because they're plants, but at a shop near my apartment a philodendron costs $25.00! Then I have to make sure that any plants I get are pet safe because of my cat Bart. And, of course, there's the tendency my plants have of dying (no matter what I do to keep them alive.)
Thursday, August 18, 2011
Boo-boo Kitty 2.0
Hello again from dark and stormy Brooklyn!
I know that it’s been a couple of weeks since my last project post and I feel really, really bad about it. I hope I can make it up to you, though, with my first foray into the world of softies.
I know that it’s been a couple of weeks since my last project post and I feel really, really bad about it. I hope I can make it up to you, though, with my first foray into the world of softies.
Monday, August 8, 2011
Sewing for Yourself
Many thanks to Jezebel.com for not only providing a healthy dose of snark everyday, but for also calling the Times on their bogus trends reporting.
For those of you who don't read the New York Times or the coverage of the Times, there is usually a regular local living feature about trends sweeping the city and, thus, soon to be sweeping the nation. One article I remember was about glamorous young women riding bicycles. They tool around the city in their fashionable frocks and pseudo-windswept hair with big sunglasses and a droll attitude that says, "I'd rather be in Paris." FYI, it's not really a trend.
Today's NYTimes has an article about the latest craze sweeping Brooklyn — sewing. Now I'm not against sewing. I love sewing. I've sewed for a very long time. HOWEVER, I am with Jezebel on this one in that this is a non-trend. (BTW, here are the links to the Jezebel article and NYTimes article.)
Why do I think it's a non-trend? Well, I think it was a non-trend before this article. It'll probably become a trend now, but that doesn't really answer the question.
The thing is that crafts like knitting, sewing, woodworking, baking, etc. have been around for a long time (obviously), but they don't get taught anymore in school. People are interested in taking classes and reading books on these crafts because they weren't able to learn these crafts when they were younger. An excellent example of this comes from my own life.
It seemed like every time I'd want to take one of those classes in high school the school board would cut them from the curriculum. I really wanted to learn how to sew when I was 15. My grandmother wasn't able to show me at the time, so I was really looking to taking sewing in school. I postponed it by a year, though, so I could get my second year of French out of the way. I wish now that I hadn't because that was the year they ended Home Ec in all schools. I didn't think I'd ever be able to learn how to sew. Luckily, I had a college major that required craftsmanship. I got to learn more than just sewing. I learned woodworking, painting, molding and casting.
And maybe another reason why I don't like the article is because it makes me feel like I'm just another hipster Brooklynite. "Oh, you sew? Of course you live in Brooklyn!"
I live in Brooklyn because I like Brooklyn and I happen to sew.
Tuesday, August 2, 2011
Macrayou? No, Macrame!
Last Friday I was running errands — killing time before my emergency dental appointment — and I popped into Dick Blick to see if they had any good crafting magazines. I didn't find any magazines I liked, but I did find this awesome book.
If you've read my second post of this blog, you'll know how fond I am of the late 70s/early 80s and this book had my holy grail — my white whale if you will — a macrame plant holder!
I wasted no time finding the supplies I needed (100 feet of cotton rope and a 1-1/2" metal ring). I even bought a plant and a really cool looking metal flower pot at IKEA. When I got home on Saturday it was time to braid and knot some rope.
Now, because of copyright, I can't share with you guys the complete step-by-step for making the plant holder. Instead I took a series of photos and have listed them in sequence down below. After the pictures I have a brief review of the project.


This project has actually pretty easy. It took about an hour to make from beginning to end. There were just two things I wish they had mentioned in the "how to":
- That you should use spare pieces of of rope to wrap and secure the pieces. I used one of the main pieces and it ended up shortening one my rope groups.
- Have someone hold the plant holder while you figure out where the end knot will be because at first I didn't and when I finally got the plant in there (have someone help you that, too) I started futzing with the ropes and making them hold the plant evenly and the plant pot fell out of the plant holder.
That said, I will definitely be making more of these. The materials — rope and a metal ring — only cost me about $15 which makes this a pretty good project for house warming presents. Plus, once you get the hang of making the plant holder, the pattern is simple enough to make it with all types of heavy-duty string and rope.
A Whole New Appreciation for Vermont
So.... My friends T&T have two adorable children and the younger one (a BEAUTIFUL little girl) turned one yesterday; the party is this weekend and I thought, instead of buying a present, I'd make her one. I was hiking to Mood last Friday anyway and I decided to get some felt and whatnot.
The only problem: I had no idea, though, what I was going to make!
Luckily, I had my sketch book with me, so I whipped out my sketch book and started sketching. That's right. I was sketching out my idea in the middle of Mood!!!!! Plus, Swatch the dog was running and playing all over the store. The only way the day could have been better was if Tim Gunn stepped out and called 5 minutes left.
I used the weekend to finish a couple of other projects and started patterning last night. Did I mention that I've never made a stuffed animal before?
The hardest part, I knew, would be the head. It's the curviest part of the design and the most geometric. I came up with a pattern last night, but I wasn't happy with it, so I patterned more tonight. Well, neither pattern was really working. At all.
So, I've set aside that idea and I'm going back to the original plan of an Ugly Doll-style stuffed toy. Yep, I did what I always do. I think "Hey! I've never done that before. I think I'd like to try it." and then choose to do the hardest version possible. I don't have the time it'll take to tweak the patterns, nor a limitless amount of muslin.
It's literally back to the drawing board for me.
Monday, August 1, 2011

Sunday, July 31, 2011
IKEA is for Lovers
Hello, all!
I've finally decided to stop procrastinating on the IKEA purse post. The bag's been done for a couple of days, but I was so tuckered out from yesterday's IKEA trip and making another project, that my mind just wanted to zone out on TCM movies and The Lost Kingdom Prophecy. But not today!
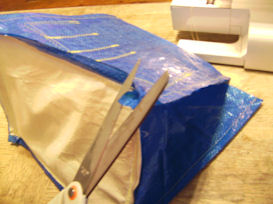
Without further ado, here is the step-by-step how-to for the Frakta purse:
Materials
2 large IKEA Frakta bags
1 spool of yellow thread
4 magnetic snap closures
1 sheet of plastic canvas
1 11" x 9" muslin piece
Multiple card stock pieces (I used the cut up box of a Target-brand ibuprofen bottle)
Sewing machine
Seam ripper
Scissors
Pliers
Ruler
Measuring tape
Straight pins
Pencil
Sharpie marker
X-Acto knife
Purse Dimensions:
Side A = 11" x 13"
Side B = 9" x 13"
Bottom = 11" x 9"
Plastic Canvas Insert = 9" x 7"
Cut 4 pieces of Sides A and B; you will making an outside and a lining. Cut 2 pieces for the bottom. Note: All purse pieces (except for the plastic canvas insert) include a 1/2" seam allowance.
The final dimensions of the bag will be 10" length x 8" width x 10" height.
Step-by-Step:

Use the seam ripper to detach all four straps.

Use the scissors to cut up the bags at the seams. Throw away the seam pieces.

 Measure and cut out the bag pieces.
Cut the long bag straps to an equal length. Put the right sides together and sew across 1/2" from each end.

When both ends are sewn together, turn the straps inside out so the right side is out. Pin the straps together.

Top stitch the straps together with a 1/4" seam allowance.
Super Crafter Tip: I used the borders to the IKEA letters as a guide while sewing.


Repeat these steps with the other two long straps.
Outside Layer

Sew together the sides of the purse until all four pieces are connected. Attach bottom of bag, beginning with the longer ends, then sew shorter ends. I took it edge by edge, but the manner of attachment is totally the crafter's preference.


Once the bottom is attached. Turn the bag inside out and use the closed scissors to shape the bottom's corners.

Now it's time for the opening's hem. Fold over the top and use the measuring tape to adjust the hem to 2.5". Pin in place and sew 1/2" from the folded edge.
Inside Layer
The inside layer is built the same way as the outside layer, but if you decide that you want pockets and what not, you will need to attach them to the Side B pieces before they are sewn together with the Side A pieces. I wanted pockets for pens, my cell phone a general pocket.

First, figure out how big you want your pockets to be. Take some of the material leftover from cutting out the purse sections and cut it to double the size you want. Fold it in half and sew 1/4" from the folded edge.

With a pencil, mark where your pocket dividers are going to be and where the pocket should be sewn to the lining.


Using the pencil lines, top stitch the pockets to one or both of the Side B lining pieces. Make sure to keep the folded half of the pocket piece to the top. If you want, you can also add some reinforcement/decoration by going around the stitching with a zig-zag stitch.

Now attach Sides A and B together.

For the lining bottom: using a zig-zag stitch, attach the muslin piece to the lining bottom on three sides. Place the plastic muslin in between the muslin and the lining bottom, then sew the forth side.

With the muslin side down, attach the lining bottom to the rest of the lining.

Trim the lining edges.


Place the lining inside the outside and fold outside, measure and pin for the hem. Then sew 1/2" from the folded edge.

There may tugging. If there is, relieve the tautness of the lining hem by cutting to about 1/4" of the hem seam.
Attaching the Straps

Using the measuring tape, pin each end of the strap 2-1/2" down onto the outside portion of the bag. I centered the strap over the seams, but after using the bag for a couple of days, I must admit that this makes closing the bag a little awkward.

Top stitch a rectangle around the strap, staying 1/4" away from the hem stitch (this will give your foot room to pass by when you attach the lining.)

Then top stitch an 'X' from the corners of the box.
Super Crafter Tip: Back stitch the entire length of each side before turning the needle. This will help reinforce the strap!

Attaching the Closures

Take a magnetic closure piece and determine where you want it to go. I put one on each of the four corners so the sides will fold inward when closed. You'll also want to make sure the closures are not too close to the hem line as they make interfere with the attaching the lining and outside together.
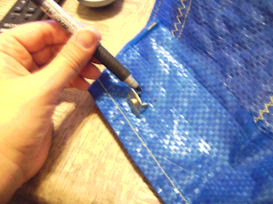
With the Sharpie, mark where the prongs will be going.

Use the X-Acto knife to make the prong openings, making sure to cut through the lining and the hem overlap.


Mark on one of the card stock pieces where the prongs are.

Cut the prong slits into the card stock piece.

Slip the closure piece through the bag material and the card stock piece. Place the washer piece over the prongs. Use the pliers to fold the prongs over.

Repeat this process with the closure's mate and then with the remaining three closures.
Finishing the Purse

Once all of the closures are attached, place the lining back into the outside structure and pin them together.

Sew the lining and outside together, using the hem line as a guide.
Super Crafter Tip: By keeping the pins on the inside of the bag can be sewn in the same way as attaching a sleeve to a shirt. It's easier to handle the bag while sewing and any ease can be hid better on the lining side.

Once the two parts are attached you have yourself a purse!
Now go take it out into the world and get ready for lots and lots of people to ask you where you got your purse.
Friday, July 29, 2011
Stay-cation Project #2
Good news, everybody! I completed my second stay-cation project tonight. I'll have the how-to and pictures up tomorrow. Plus I have pictures of my first project hanging up on the wall! Those will be posted tomorrow, too.
I am also happy to announce that I have my next few projects lined up. A couple will be matching accessories to tomorrow's project, one is going to be a birthday present for a friend's daughter, and the last will be a two-fer — a project that I've been wanting to do for a long, long time, while at the same time being the first project from a book or magazine for me to try and review.
In addition to the plethora of projects I have ahead and I also have lots of other great topics for posts bouncing around my noggin. So please keep checking in.
Wednesday, July 27, 2011
Put A Freakin' BIRD On It!
The first project I made this week on is a variation of this wall art project that my roommate
Nina found online. She sent it to me because we both love the 'Put a Bird on It' sketch from Portlandia. We now laugh when we see anything with a bird on it — usually in a very judgmental way. "Ha Ha! Look at those hipsters and their birds!" we always say.* (*we don't really say this) This time, though, I took a look at the project and said, "I want to make that!"
I'm not making the same exact project, however. While I'm using a similar background for my project, the images will be completely different. Instead of birds on branches, I decided to make stylized silhouettes of a squirrel and an owl.
Here's what you need to make this project:
- Two blank canvases (I get mine from Dick Blick.) — The two I used are both 20' x 20'.
- Paper — I used the pages of an old thesaurus, but you can use anything you want as long as you can collage it.
- White glue — The best glues I've used for projects like this are Plaid Mod Podge and good, ol' Elmer's Glue-All. For this project I used Mod Podge.
- Various collage supplies — a 1-1/2" chip brush, a popsicle stick for crafting, a container to hold the adhesive mixture.
- Drawing supplies — pencils, black markers, erasers, sketchbook, etc.
- Cutting supplies — scissors, X-Acto knife, cutting mat
- Other supplies — tracing paper, cardboard, latex/non-latex gloves,
Here's what I did:

First, I ripped all of the pages out of an old thesaurus I found at the NYC Strand Bookstore for a whopping $.48.
Next, I laid my two canvasses on the kitchen counter, using an extra-large, clear recycling bag to protect the surface. Note: the adhesive mixture will cause the canvasses to stick to the work surface, but the plastic of the recycling bag will peel easily away from the canvasses and will not damage the collage work.

I mixed one part Mod Podge with one part water to create the collage adhesive mixture. I know the original craft article suggests a mixture of two parts water and one part glue, but I quickly found out that, with that mixture ratio, the paper didn't wrap around the edges of the canvas very well.
SUPER CRAFTER TIP: Use warm water for your adhesive mixture. It mixes better and faster with the glue, and it makes the paper more pliable. =)

Next, I took the chip brush and dipped it in the adhesive mixture and spread it over a section of the canvas edge. Then I spread some over the back of one of thesaurus pages. I placed the thesaurus page on the edge of the canvas with half of the page hanging off of the side. I then dipped the brush in the adhesive mixture again and spread it over the top of the page and continued to spread until the page wrapped around to the back of the canvas. I repeated this until the entire canvas edge is covered.

Once the edge of the canvas was covered, I continued the process with the rest of the canvas until it was completely covered. You can arrange the pages anyway you want, but I went with an all askew look for mine.
SUPER CRAFTER TIP: Once you're done with attaching all of the collage pages, add additional coats of the adhesive mixture to help firmly secure the pages and to give the collages a nice, glossy glow.
I let the canvases dry overnight.


While I was waiting for the canvases to dry I worked on the silhouettes. I decided to go with an owl and a squirrel, but because the size of my canvases are so large I knew that I wouldn't be able to print out a photo large enough to create a silhouette. Also, I wanted to have a more stylized look to my silhouettes, so I decided to find photos for reference online and then sketch out what I wanted.


I then use tracing paper to transfer the sketch from the sketch pad to some cardboard. Once the sketch was transferred I cut the silhouette out of the cardboard to create a stencil.

I also made a stencil of some leaves in three different sizes.

Next, I went to bed, slept for about six to eight hours, got up, and had a bowl of granola cereal with some almonds and raisins.
By the time I finished my cereal the canvases were dry and ready to be drawn on.

I determined the center of the canvas and placed the center of the stencil on the canvas center (this was done by eyeballing, no complicated marks or arithmetic.) Then I traced the stencil with a pencil.

I then used a Sanford King Size maker to fill in the penciled stencil. Once the first layer was dry, I filled in again with the marker to make sure that the color was solid and even.

Once both stencils were done, I laid out the borders for the leaves.

You can barely see it, but that is a pencil line beneath the owl's tail.

Next I placed the leaf stencil in random directions along the border.

I outline the leaves...
 and then filled them in.

SUPER CRAFTER TIP: It looks really cool to wrap the leaves over the edge of the canvas.
WELL! There's the first stay-cation summer project. I'll post another photo of them when I hang them in the hallway. Don't be afraid to try it yourself and if you have any question, hints, or tips, please do not hesitate to post them in the comments below.
Subscribe to:
Posts (Atom)