Hello, all!
I've finally decided to stop procrastinating on the IKEA purse post. The bag's been done for a couple of days, but I was so tuckered out from yesterday's IKEA trip and making another project, that my mind just wanted to zone out on TCM movies and The Lost Kingdom Prophecy. But not today!
Without further ado, here is the step-by-step how-to for the Frakta purse:
Materials
2 large IKEA Frakta bags
1 spool of yellow thread
4 magnetic snap closures
1 sheet of plastic canvas
1 11" x 9" muslin piece
Multiple card stock pieces (I used the cut up box of a Target-brand ibuprofen bottle)
Sewing machine
Seam ripper
Scissors
Pliers
Ruler
Measuring tape
Straight pins
Pencil
Sharpie marker
X-Acto knife
Purse Dimensions:
Side A = 11" x 13"
Side B = 9" x 13"
Bottom = 11" x 9"
Plastic Canvas Insert = 9" x 7"
Cut 4 pieces of Sides A and B; you will making an outside and a lining. Cut 2 pieces for the bottom. Note: All purse pieces (except for the plastic canvas insert) include a 1/2" seam allowance.
The final dimensions of the bag will be 10" length x 8" width x 10" height.
Step-by-Step:

Use the seam ripper to detach all four straps.

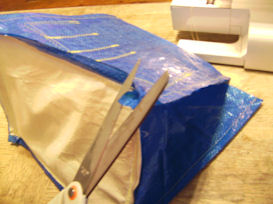
Use the scissors to cut up the bags at the seams. Throw away the seam pieces.

 Measure and cut out the bag pieces.
Cut the long bag straps to an equal length. Put the right sides together and sew across 1/2" from each end.

When both ends are sewn together, turn the straps inside out so the right side is out. Pin the straps together.

Top stitch the straps together with a 1/4" seam allowance.
Super Crafter Tip: I used the borders to the IKEA letters as a guide while sewing.


Repeat these steps with the other two long straps.
Outside Layer

Sew together the sides of the purse until all four pieces are connected. Attach bottom of bag, beginning with the longer ends, then sew shorter ends. I took it edge by edge, but the manner of attachment is totally the crafter's preference.


Once the bottom is attached. Turn the bag inside out and use the closed scissors to shape the bottom's corners.

Now it's time for the opening's hem. Fold over the top and use the measuring tape to adjust the hem to 2.5". Pin in place and sew 1/2" from the folded edge.
Inside Layer
The inside layer is built the same way as the outside layer, but if you decide that you want pockets and what not, you will need to attach them to the Side B pieces before they are sewn together with the Side A pieces. I wanted pockets for pens, my cell phone a general pocket.

First, figure out how big you want your pockets to be. Take some of the material leftover from cutting out the purse sections and cut it to double the size you want. Fold it in half and sew 1/4" from the folded edge.

With a pencil, mark where your pocket dividers are going to be and where the pocket should be sewn to the lining.


Using the pencil lines, top stitch the pockets to one or both of the Side B lining pieces. Make sure to keep the folded half of the pocket piece to the top. If you want, you can also add some reinforcement/decoration by going around the stitching with a zig-zag stitch.

Now attach Sides A and B together.

For the lining bottom: using a zig-zag stitch, attach the muslin piece to the lining bottom on three sides. Place the plastic muslin in between the muslin and the lining bottom, then sew the forth side.

With the muslin side down, attach the lining bottom to the rest of the lining.

Trim the lining edges.


Place the lining inside the outside and fold outside, measure and pin for the hem. Then sew 1/2" from the folded edge.

There may tugging. If there is, relieve the tautness of the lining hem by cutting to about 1/4" of the hem seam.
Attaching the Straps

Using the measuring tape, pin each end of the strap 2-1/2" down onto the outside portion of the bag. I centered the strap over the seams, but after using the bag for a couple of days, I must admit that this makes closing the bag a little awkward.

Top stitch a rectangle around the strap, staying 1/4" away from the hem stitch (this will give your foot room to pass by when you attach the lining.)

Then top stitch an 'X' from the corners of the box.
Super Crafter Tip: Back stitch the entire length of each side before turning the needle. This will help reinforce the strap!

Attaching the Closures

Take a magnetic closure piece and determine where you want it to go. I put one on each of the four corners so the sides will fold inward when closed. You'll also want to make sure the closures are not too close to the hem line as they make interfere with the attaching the lining and outside together.
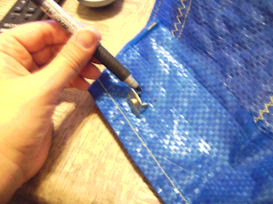
With the Sharpie, mark where the prongs will be going.

Use the X-Acto knife to make the prong openings, making sure to cut through the lining and the hem overlap.


Mark on one of the card stock pieces where the prongs are.

Cut the prong slits into the card stock piece.

Slip the closure piece through the bag material and the card stock piece. Place the washer piece over the prongs. Use the pliers to fold the prongs over.

Repeat this process with the closure's mate and then with the remaining three closures.
Finishing the Purse

Once all of the closures are attached, place the lining back into the outside structure and pin them together.

Sew the lining and outside together, using the hem line as a guide.
Super Crafter Tip: By keeping the pins on the inside of the bag can be sewn in the same way as attaching a sleeve to a shirt. It's easier to handle the bag while sewing and any ease can be hid better on the lining side.

Once the two parts are attached you have yourself a purse!
Now go take it out into the world and get ready for lots and lots of people to ask you where you got your purse.
No comments:
Post a Comment